How to Write a Good Bug Report: A Practical Guide
What Is a Bug Report?
Finding a bug is only the first step.
For the issue to be investigated and fixed efficiently, the person receiving the report needs to understand exactly what happened, where it happened, and how to reproduce it.
A bug report is a structured description of an issue found during testing. Its purpose is to give developers, designers, product owners, or other team members enough information to reproduce, understand, prioritize, and resolve the problem.
A good bug report reduces unnecessary back-and-forth.
A poor report creates questions.
Compare these two examples:
Poor bug report:
The form does not work.
Better bug report:
Contact form submission fails on Safari 18.6 after completing all required fields. Clicking Submit displays a loading indicator, but no success message appears and the form data is not received.
The second report immediately gives the team something useful to investigate.
If you are new to website quality assurance, start with:
Why Good Bug Reports Matter
Bug reporting is not simply administrative work.
The quality of a report can directly affect how quickly an issue is understood and resolved.
A clear bug report helps teams:
- reproduce the issue;
- understand the user impact;
- identify the affected environment;
- assess severity and priority;
- reduce unnecessary clarification;
- verify the eventual fix;
- maintain a useful history of known issues.
Poor reports often result in comments such as:
- “Cannot reproduce.”
- “Which browser?”
- “What did you click before this happened?”
- “What did you expect to happen?”
- “Do you have a screenshot?”
- “Does this happen every time?”
A good report answers most of these questions before they need to be asked.
The Essential Parts of a Good Bug Report
A practical bug report should contain enough information to make the issue understandable and reproducible without becoming unnecessarily complicated.
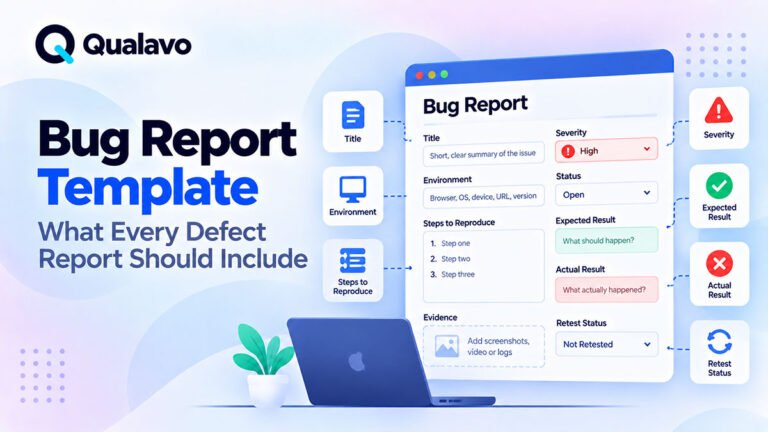
At minimum, include:
- a clear title;
- environment details;
- preconditions, if needed;
- steps to reproduce;
- expected result;
- actual result;
- severity or impact;
- evidence;
- relevant notes.
Let’s look at each one.
1. Write a Clear Bug Title
The title should summarize the problem in one sentence.
Avoid titles such as:
- Form broken
- Mobile issue
- Button problem
- Checkout bug
- Doesn’t work
These are too vague.
A useful title normally identifies:
where + what happens + under what condition
For example:
Contact form does not submit on Safari after completing all required fields
or:
Mobile navigation overlaps the page title at 375px viewport width
or:
Checkout total does not update after removing a product from the cart
A tester should be able to scan a bug list and understand the basic issue without opening every report.
Good title formula
You can use:
[Feature/Location] + [Problem] + [Condition]
Example:
Password reset link displays an expired-token error immediately after request
The title should describe the defect, not your interpretation of its cause.
Avoid:
Backend API is broken
unless you have actually confirmed that the API is responsible.
Report what you can observe.
2. Record the Environment
Many website issues occur only in specific environments.
Always record the relevant testing context.
This may include:
- environment;
- URL;
- browser;
- browser version;
- operating system;
- device;
- viewport;
- user role;
- build or release version.
Example:
Environment: Staging
Browser: Safari 18.6
OS: macOS
Viewport: 1440 × 900
URL: /contact/
For mobile issues:
Device: iPhone 15
Browser: Safari
OS: iOS
Orientation: Portrait
This information can be critical.
An issue that occurs in Safari but not Chrome is very different from one that affects every browser.
A defined browser and device test matrix helps teams make this information consistent across reports.
3. Add Preconditions When Necessary
Some bugs cannot be reproduced from a fresh page load.
The tester may need to be:
- logged in;
- logged out;
- using a specific account type;
- using a product already added to the cart;
- assigned a particular permission;
- on a certain workflow step;
- using specific test data.
These conditions should be documented before the reproduction steps.
Example:
Preconditions:
- User is logged in as an Administrator.
- One product is already present in the cart.
- Coupon
TEST20is active.
Do not hide important setup information inside the reproduction steps.
4. Write Clear Steps to Reproduce
The reproduction steps should allow another person to follow the same path and observe the same problem.
Each step should describe one action.
For example:
- Open the Contact page.
- Enter a valid name.
- Enter a valid email address.
- Enter a message.
- Click Submit.
- Observe the result.
Avoid vague instructions such as:
Fill everything in and try it.
or:
Go through checkout normally.
Another tester may interpret “normally” differently.
Keep reproduction steps minimal
Include only the actions required to trigger the bug.
If ten unrelated clicks occurred before the issue, but only four are needed to reproduce it, use the four relevant steps.
Shorter, precise reproduction paths are easier to debug.
5. Describe the Expected Result
The expected result explains what should happen when the feature works correctly.
Example:
After clicking Submit, the form should be submitted successfully, a confirmation message should appear, and the enquiry should be delivered to the configured recipient.
Expected results should be specific.
Avoid:
It should work.
That does not explain the intended behavior.
When available, expected behavior can be based on:
- requirements;
- acceptance criteria;
- designs;
- previous behavior;
- documented business rules.
6. Describe the Actual Result
The actual result records what really happened during the test.
Example:
After clicking Submit, the loading indicator appears for approximately two seconds and then disappears. No confirmation message is displayed, and no enquiry is received.
The actual result should be factual and observable.
Avoid emotional or speculative descriptions.
Not:
The form completely breaks because the JavaScript is bad.
Better:
Clicking Submit produces no confirmation message. The browser console shows an uncaught JavaScript error.
The second version separates observation from diagnosis.
Expected Result vs Actual Result
These two fields are particularly important because they describe the gap between correct and incorrect behavior.
For example:
Expected result:
The user should be redirected to the order confirmation page after successful payment.
Actual result:
The payment succeeds, but the user remains on the checkout page and sees an indefinite loading indicator.
This format makes the defect immediately understandable.
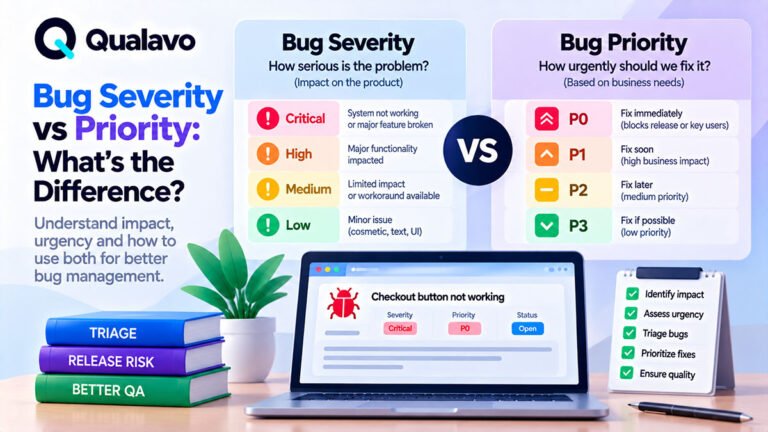
7. Record Severity and Impact
Not every bug has the same importance.
A typo in a footer and a checkout failure should not be treated equally.
A simple severity model might include:
Critical
The issue blocks a critical business or user workflow and no practical workaround exists.
Examples:
- checkout completely unavailable;
- application inaccessible;
- serious permission failure;
- production data at risk.
High
A major feature is significantly affected, but the entire system is not unusable.
Examples:
- signup fails for a major user group;
- mobile navigation cannot be used;
- an important form fails on a supported browser.
Medium
The issue affects functionality or usability but does not prevent the primary workflow.
Examples:
- incorrect validation message;
- layout issue on a secondary page;
- non-critical filter behaves incorrectly.
Low
Minor visual, content, or usability issue with limited impact.
Examples:
- inconsistent spacing;
- small alignment problem;
- typo.
Severity and priority are related, but they are not the same thing.
A low-severity issue may still have high business priority, for example if incorrect pricing text appears on the homepage before a major campaign.
8. Attach Useful Evidence
Evidence can make a bug significantly easier to understand.
Useful evidence may include:
- screenshots;
- screen recordings;
- console errors;
- network responses;
- timestamps;
- error messages;
- request IDs;
- relevant logs.
Screenshots
Screenshots work well for:
- visual defects;
- incorrect content;
- missing elements;
- alignment issues;
- error messages.
Mark the affected area if the problem is not immediately obvious.
Screen recordings
Recordings are especially useful for:
- interaction problems;
- modal behavior;
- navigation bugs;
- timing issues;
- multi-step workflows;
- animations.
A 15-second recording may explain an interaction issue better than several paragraphs.
Do not attach irrelevant evidence
More evidence is not automatically better.
Attach what helps someone understand or reproduce the issue.
9. Include Reproducibility Information
If useful, state how consistently the issue occurs.
For example:
Reproducibility: 5/5 attempts
or:
Reproducibility: Intermittent, approximately 2/5 attempts
This distinction matters.
A bug that happens every time may be easier to investigate than an intermittent failure.
For intermittent issues, document anything that appears related:
- timing;
- network condition;
- browser;
- account;
- test data;
- previous action.
Example of a Complete Bug Report
Here is a practical example.
Title
Contact form does not submit on Safari after completing all required fields
Environment
- Environment: Staging
- Browser: Safari 18.6
- OS: macOS
- URL:
/contact/
Preconditions
None.
Steps to Reproduce
- Open the Contact page.
- Enter a valid name.
- Enter a valid email address.
- Enter text in the Message field.
- Click Submit.
Expected Result
The form should submit successfully, display a confirmation message, and send the enquiry to the configured recipient.
Actual Result
The loading indicator appears briefly and then disappears. No success message is displayed, and no enquiry is received.
Severity
High
Reproducibility
5/5 attempts
Evidence
- Screenshot attached
- Screen recording attached
- Browser console error attached
That report gives the developer a clear starting point.
Common Bug Reporting Mistakes
Even experienced teams can fall into habits that reduce report quality.
Reporting Several Bugs in One Ticket
Avoid combining unrelated problems.
For example:
Footer spacing is wrong, contact form fails, and the mobile menu icon is too small.
These should normally be separate reports.
One ticket should represent one logical defect.
This makes:
- assignment easier;
- severity clearer;
- retesting simpler;
- status tracking more accurate.
Writing Vague Steps
Avoid:
Open site and try checkout.
Use specific actions.
Forgetting the Environment
If the issue only happens in Safari, the browser is not optional information.
Reporting Assumptions as Facts
Avoid:
Database connection is broken.
unless you have verified it.
Prefer:
Clicking Save returns a 500 error.
Missing Expected Behavior
Without the expected result, the developer may not know whether the observed behavior is actually incorrect.
Using Screenshots Instead of Written Information
A screenshot should support the report, not replace it.
Do not create a ticket that contains only an image and:
See screenshot.
The report should still contain enough written context to understand the defect.
Bug Reports Should Be Easy to Retest
A bug report has a second purpose after the issue is fixed:
retesting.
When a developer marks the bug as resolved, another tester should be able to return to the original report and repeat the same steps.
The retest should confirm:
- the original issue no longer occurs;
- the expected behavior now works;
- the fix works in the relevant environment;
- related functionality has not been negatively affected.
A clear original report makes this process much easier.
Use a Consistent Bug Report Template
Teams should not reinvent the structure of every bug report.
A repeatable template improves consistency.
A simple structure can be:
Title
Environment
Preconditions
Steps to Reproduce
Expected Result
Actual Result
Severity
Evidence
Notes
This structure works for many website QA workflows without becoming overly complicated.
For teams that want a ready-to-use QA foundation, Qualavo QA Lite includes a structured Simple Bug Report Template alongside the core website QA checklist.
For workflows that also require structured issue prioritization and triage, QA Starter extends the process further.
Bug Reporting Is Part of a Larger QA Workflow
Bug reporting should not exist in isolation.
A practical QA workflow looks something like:
Test → Report → Triage → Fix → Retest → Release
Testing identifies the problem.
Reporting documents it.
Triage determines its importance.
Development resolves it.
Retesting verifies the fix.
Release management determines whether the remaining risk is acceptable.
This is why good bug reporting is one of the foundations of repeatable website QA.
Website QA Checklist: What to Test Before Launch
A Quick Bug Report Checklist
Before submitting a bug, ask:
- Is the title clear?
- Did I specify the environment?
- Are the reproduction steps complete?
- Can another person follow the steps?
- Did I describe the expected result?
- Did I describe the actual result?
- Is severity appropriate?
- Did I include useful evidence?
- Did I avoid assumptions?
- Is this one logical issue?
- Will someone be able to retest it later?
If the answer is yes to these questions, your report is likely ready to submit.
Final Thoughts
A good bug report does not need to be long.
It needs to be clear, reproducible, factual, and useful.
The most important information is:
what happened, where it happened, how to reproduce it, what should have happened instead, and what evidence supports the report.
The better this information is documented, the less time teams spend clarifying issues and the more time they can spend fixing them.
A repeatable bug reporting format also makes QA easier to scale across projects, testers, developers, and clients.
Need a structured way to document website issues? Explore the Qualavo QA systems and choose the workflow that fits your testing process.